
|
"Bridge to Nowhere"
|
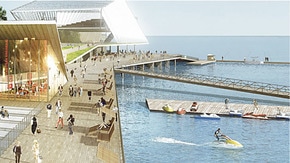
The goal of this project was to create an architectural model that could be installed along the coast of the lake. I wanted to make a way for people to get as close to the water as they’d like. To do this, I used a modern take on the pier. The sections descend into the water in large stairs, so people can wade into the water farther out from the shore. My pier extends nearly 40 feet out from the shore, allowing people to experience the ocean in a whole new way. This essentially creates a bridge that goes “nowhere” but into the water.
Background Research
My inspiration came from large scale piers. These are usually boardwalks along the oceans. They're meant to allow people to walk around the beach without getting wet or trudging through the sand. This makes them a main hub to hang out. These boardwalks sometimes go over water, sand or both, but they usually don't actually descend into the water. I wanted my pier to allow people to get as close to the water as they were comfortable with.
My main inspiration came from the works on Roger Partners and ASD. The project is meant to revamp the St. Petersburg's Pier in Australia, which had originally been built in the 1880's and hadn't been updated more than basic reparations scene the addition of the building by William B. Harvard in the 1960's.
My main inspiration came from the works on Roger Partners and ASD. The project is meant to revamp the St. Petersburg's Pier in Australia, which had originally been built in the 1880's and hadn't been updated more than basic reparations scene the addition of the building by William B. Harvard in the 1960's.
My design is considerably simpler. It only has one pier section, which descends into the water. The St. Petersburg's Pier is considered a "hybrid" pier and park, as the pier is attached to a park near the shore.
Planning
|
My main goal was to allow people to get as close to the water as they want. I love going down to the lake, but there is no safe way to get closer to the water without wading down in the water. Climbing on the wave-breaks can be dangerous, especially on windy days when the waves are stronger.
Our planning was making models using card stock paper and chipboard. I could plan out what I wanted to do without needing to completely redo the model. The paper models that needed to be held up vertically could be done by cutting a line into the corrugated cardboard that makes up the land. Some models don't even need this, which makes creating multiple models using the same board easy. The first model I made was my best one. It had a great connection to real life, and looked the best. Using an exacto-knife, I cut out 2 rectangles into a sheet of card stock. Then, I cut about 10 rectangles out of the chipboard, each about an inch in either direction. I placed each end-up on the paper, and traced it with a pencil, then cut out the rectangle with the exacto-knife. I then needed to repeat this with the other card stock rectangle. I would then repeat this, moving the cut area down in a slight slope to create a descending staircase. To put this together, I pushed the ends of one of the chipboard steps through the hole on either card stock rectangle. Some of the rectangles didn't fit perfectly, but with a bit of fiddling, I got all of the pieces without ripping the card stock. I knew in my final piece, the walls would be made of bass wood, so the way the paper bent from being over worked wouldn't be an issue. I also knew that only cutting the hole to place the flooring wouldn't work. The wood wouldn't give enough if I didn't make the holes large enough again. To get around this, I planned to cut each rectangle into 2 pieces along a descending zigzag line. The last thing I needed to resolve was the complete lack of a way to actually get to the top of the staircase. When I made the practice model, I planned on the slope being slight enough that the starting platform would be about level to the land, while the peer would continue far enough off the coast into the water. I would need to find a way for people to get up onto the first platform. |


|
Process
|
Once I had all of these pieces together, I glued them into place. Unfortunately, I forgot to make a way up to the top, which kinda ruins the whole point of having a piece you can climb on.
|
To get around this, I needed to completely remake the wooden side pieces. I used an exacto-knife to cut the glue, and pull everything apart. Then I traced the stair shapes onto more bass wood, but this time added a rectangular shape to the end. I cut out this shape, and remade one of the bottom parts that cracked when being glued. I put the bottom together first, so the structure could stand on its own, then cut a groove out of the triangle. With another bit of chipboard, I made a floor that could fit in this groove. To finish the main structure, I glued the bottom of the triangle to the bottom of the chipboard flooring.
Lastly, I needed to make another background to display this without the extra grooves from previous models I made for the mid-way check-up. I just made another background like I did for the practice model, with 2 sheets of corrugated cardboard and a piece of black chipboard. I cut 2 grooves into the corrugated board, and glued the structure down.
Lastly, I needed to make another background to display this without the extra grooves from previous models I made for the mid-way check-up. I just made another background like I did for the practice model, with 2 sheets of corrugated cardboard and a piece of black chipboard. I cut 2 grooves into the corrugated board, and glued the structure down.
Reflection
Making this project wasn't hard, but it was time consuming, do to all of the measuring I needed to do. I found it really hard to find an artist that I could base my project on. My inspiration is based on a style that has existed for about as long as people have been around. The only popular piers I know of are boardwalks, which doesn't really fit with my project.
As far as actually making and designing the structure, I wish I had included the fixed the design flaws before making the wood structures, because I had to waste a good amount of resources. Better planning on my account would have saved me a lot of time.
As far as actually making and designing the structure, I wish I had included the fixed the design flaws before making the wood structures, because I had to waste a good amount of resources. Better planning on my account would have saved me a lot of time.
Success Criteria Questions
- How does your work create a relationship between land and water?
The "bridge" actually functions more like a peer, sticking out of the shore, into the water. This allows the viewer to get closer to the water. This not only gives a bridge between the land and water, it also takes into account the changing water. The bridge also functions as a stairwell going down into the water. - What Feelings will people have upon seeing, entering and walking through your structure? Explain the feeling people will have on their journey through your structure.
Upon first seeing the structure, people will want to climb on it, to get a better view of the lake. From my time down at the lake, I see people doing this on the breakwaters meant to lessen the waves, even though it can be dangerous and usually gets them wet. Entering my structure raises them up, so they can see better. The walls on the side are meant to be low enough to offer a view from all directions; the overall goal is to give people a nice view of the surrounding area, not only the shoreline. As they continue through the structure, they will be suspended, though not very high, over the water. The bridge continues down into the water, allowing people to get as close as they'd like to the water. - How does your structure embrace the lake?
The structure allows the viewer to get closer to the lake than they can by simply standing on the shore. This enhances the relationship between the viewer and the lake, letting them appreciate the lake more. - How does your structure use the fundamental architectural components of path, portal, and place?
My structure mainly utilizes path, as it functions similarly to a bridge between the water and land. There is also a slight use of portal, at the beginning of the bridge. Because the bridge continues down into the water, there is no portal on the other side. There is also little use of place, as there is no defined viewing area.
- How does your structure embody meaning?
The goal of my structure isn't to create an obstruction from any part of the lake. The goal is to allow the people to not only get as close to the water as they please, but also to let them view any part of the surrounding area they could want. When I go the lake shore, I never only look at one aspect of the area. Most of the places I go to around the lake also have beautiful hiking paths through forests and parks. You can see the forest from the shore. I don't want my structure to only allow people to view the lake. I want them to be able to appreciate all of the surrounding areas. - Describe at least 3 meaningful decisions.
- My Inspiration: I wanted to draw inspiration from designs that are tried-and-true. Something that has a use in the world, other than as an art installation. I wanted it to appear natural, or at least not have a modern look to it. That's why I based it off a peer, which has been used for literal millenniums.
- Planned Materials: Although the model is made with the same materials as everyone else, I planned to use wood as the flooring. Most of the designs are more modern, and utilize solid concrete. Unless it's not allowed, I want to use concrete for the walls that go up around the peer, but I want to use wood planks for the floor. This is due to my inspiration being drawn from a peer.
