|
"Kakapo"
|
Background Research
|
My artist inspiration is Jen Bartel, an illustrator out of Minneapolis, who specializes in digital art. She uses a few types of art styles for different prints, but the style she uses for her pop-art inspired pieces. The use of solid lines and bright colors are closely connected to pop art, with a more modern twist. Do to the advantages of working digitally, lines can be recolored and palettes adjusted to take full advantage of the bright colors easily available to digital artists. Getting crisp, clean line work is also easier with digital art, as stabilizers can be applied to pens to smooth out lines and ctr+z allows unwanted lines to be easily removed without damaging the canvas or paper.
Many of Bartel's prints available are parts of series, one of which is on endangered animals. While looking for inspiration for a bright pop piece, her use of color and line caught my attention, really popping (pardon the pun) out from the more naturally colored pieces around it. |
|
Many pop pieces use iconic imagery that almost anyone in that era could recognize. This is done to blur the lines between "high class" art and "low class" consumerism. Do to the rise of the internet, this is already a blurred line. Almost anyone could identify the Mona Lisa, or Van Gogh's Starry Night. Most "modern" pop art doesn't hold the same meanings as true pop art. Bartel's works seem to be more of a consumerist good itself. Some of the pieces, such as her series on endangered animals are meant to construct a story, or spread a message of some kind, but others seem to be more purely for the aesthetic, such as her galaxy cats. Still others act as promotional material for famous Studio Ghibli movies, or popular video games.
I also chose to do a work on endangered species. I planned to do this before I discovered Bartel's works, but her images continually showed up in the search results for my reference images. I really liked the use of such bright colors. You couldn't help but notice it. The art style itself also caught my attention, as the lines themselves were colored with bright colors and even gradients, which tied the line art to the coloring and background better, by keeping the entire image within a color palette.
I also chose to do a work on endangered species. I planned to do this before I discovered Bartel's works, but her images continually showed up in the search results for my reference images. I really liked the use of such bright colors. You couldn't help but notice it. The art style itself also caught my attention, as the lines themselves were colored with bright colors and even gradients, which tied the line art to the coloring and background better, by keeping the entire image within a color palette.
Process
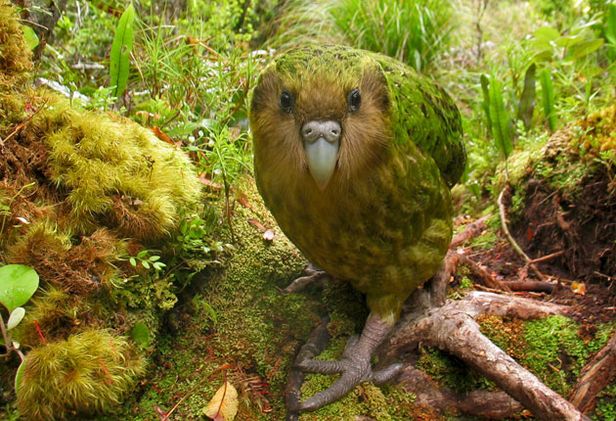
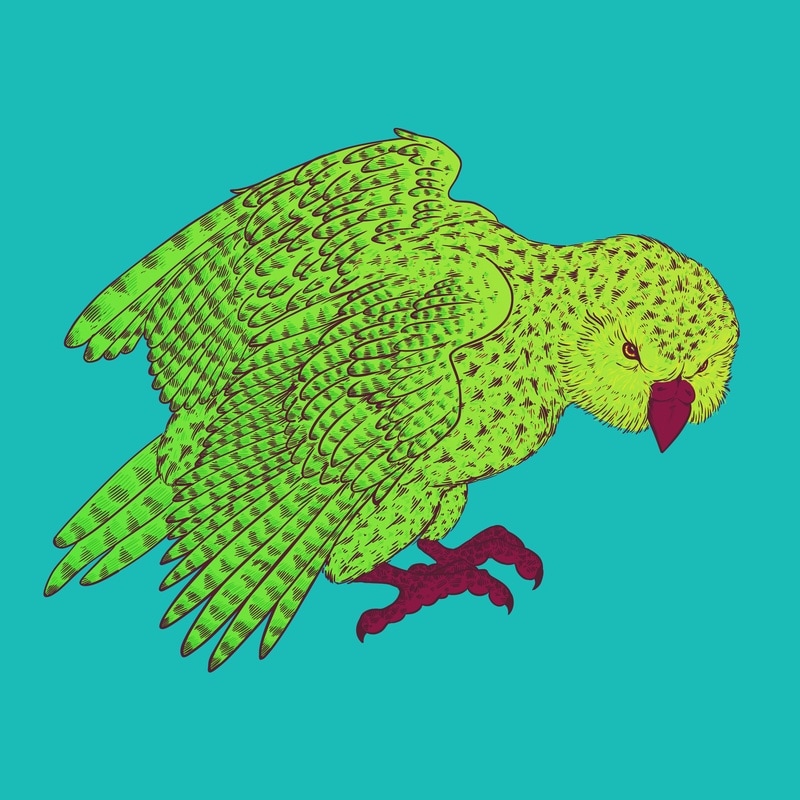
I knew what animal I wanted to do this piece on: one of my favorite animals, the Kakapo. Their natural colors lend well to the bright color scheme, and it's different enough from the other animals Bartel did illustrations of already. Their plumage is naturally camouflaged to keep them hidden on the forest floor, which would work well in a primarily green color palette, but to keep such vibrant colors as the original pieces, accent colors would be vibrant yellows and blues.
I use a free art program called Medibang, which gave me plenty of tools to edit my work and a lot of good, free pens and markers to work with. I also used a Waccom Bamboo tablet, which doesn't have a built in screen and needs to have the nib replaced, meaning I did a lot of scratching out what I did and redoing it.
I use a free art program called Medibang, which gave me plenty of tools to edit my work and a lot of good, free pens and markers to work with. I also used a Waccom Bamboo tablet, which doesn't have a built in screen and needs to have the nib replaced, meaning I did a lot of scratching out what I did and redoing it.
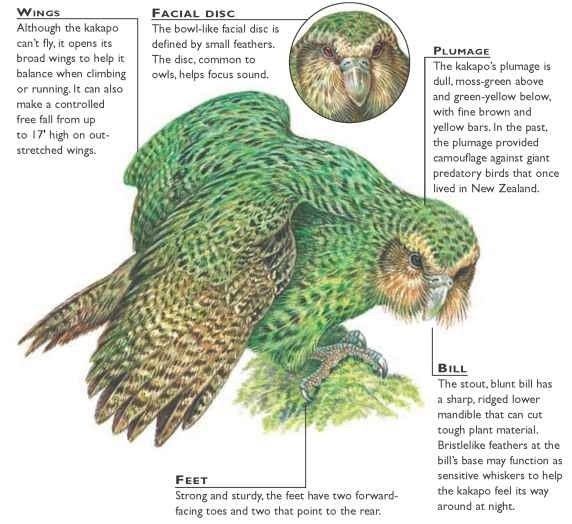
In Medibang, I opened a new file, sized at 20 x 20 cm, and started my sketch. My pose was based off an anatomical study of a kakapo, which gives a good view of it's face and wings. Using the pencil tool, I sketched out the basic shape of the bird, including some layering of the feathers on it's wings, and some of the more basic facial features. I colored these lines yellow and the background a dark blue, and lowered the opacity of the layer so I could see the lines I was making for the actual line art as well as the guides I made.
Using a different color and the pen tool, I added some more fine details to the sketch of the face, so I could make more accurate lines. Then, in a new layer, I used black and a larger size of the pen tool to draw the facial features in solid, flowing lines. I also turned a stabilizer on the pen up, so the lines wouldn't look so wobbly. I usually use a stabilizer at around 5-7 but because I was drawing this early in the morning while I was sick, and I was a bit shaky, I turned the stabilizer up to 10-15.
Next, I made the black feathers that are layered in with the standard green plumage on his head and body. On the sketching layer, I used another color to mark the general lines the feathers follow, and, using another layer, so coloring the lines would be easier later, I made the black tipped feathers. These were made by using small, quick lines in triangle shapes to give it a feathered look, and allow green to show through the lines later.
The front wing was when things started getting hard for me. I have a hard time drawing when I'm zoomed out to far, and if I zoom in, the feathers don't lay right, and go in every direction. Using a light blue on the sketching layer, I outlined the general area of each feather on the wing. On a new layer, I used the curves tool to carefully plot the curve around the front of the wing, to make the line look fluid but accurate. Then I when over the curve guide with a large pen. For the smaller feathers, I could draw them directly, but the larger ones looked awkward. To get around this, I drew one feather that looked good on the side of the paper, and selected it. Using ctr+t, I used free transform to re position it into the correct shape. Then I would copy and paste the feather, and repeat the process. This way, all of the feathers looked even and shaped correctly. Then I merged all of the layers of feathers into one layer, to make it easier to edit them.
I repeated this process with the back wing, including using the curves tool to get a smooth outline of the front of the wing. I drew what I could free hand, and used free transform to do the ones I couldn't. This helped keep the lines smooth and kept my arm from cramping, from doing the same repetitive movements.
The legs were off a bit, making them look to long to support the body. I used ctr+t to re position the legs in the sketching layer, and went over the sketch, making more details. Then, I made the official lines. I not only did the upper thigh, where their are feathers, but also the claws. Lastly, I drew the tail, using the same methods to make the long feathers. Now that the line art was finished, I merged all of the layers with line work down to one layer, so it could be recolored easier.
The bright colors come in at this point. I used the gradient tool to make a gradient on a new layer in between the background and line art, I selected the entire form, and used a green/yellow gradient for the main color of the bird. I then deselected the area, and erased some of the parts that were out of the lines.
For the detailed coloring, I used the main colors of the palette, and used small lines to actually color the area. Unless zoomed in quite a bit, it only gives a slight colored effect, do to how similar the colors are. The thin yellow lines around the face are hard to make out, but from afar tint the face a yellow-green color. The darker green also does this, tinting the rest of it's body a more solid green.
These more detailed colors were also used to give the feathers more details, as they have small patterns I wanted to include. This took a lot of effort, as the small lines hurt your wrists after a while. The fine details really make the piece pop.
Expirimentation
This was one of my first times working with digital art. I had my tablet, and I played around with it for a while, but I had never really gotten the hang of it. I had to spend quite a bit looking up how to use many of the tools, and Medibang doesn't have the best interface. To use free transform, you need to know the keyboard shortcut, or you will need to navigate through multiple menus every time. Some of the tools don't have clear instructions on how to use them, or what they do, and there's not tool tips. This means I had to look up a lot of things that aren't clear.
That being said, I did learn quite a lot, and I find working in this program do-able. This gave me a reason to sit down and take the time to experiment with new brushes and ways to create the lines I needed. I had to play around with some of these tools:
That being said, I did learn quite a lot, and I find working in this program do-able. This gave me a reason to sit down and take the time to experiment with new brushes and ways to create the lines I needed. I had to play around with some of these tools:
- curves tool: used to create a vector-style guide, that your pen will auto-lock onto when drawn over
- snap setting: the only way I've found to clear the previous curve guide. There's probably a real way to do it, but i don't know how.
- protect-alpha: an option that will only allow new changes made to the layer to effect areas that aren't transparent on that layer.
- gradient tool: uses the 2 current colors to create a gradient. The smoothness of the gradient is determined by the length of the line drawn.
These tools will be very useful if I want to continue digital art, and being able to adapt to different programs is useful.
Reflection
I'm really proud of how this turned out, especially considering my time constraints and that I was sick the whole time, making my lines a bit shaky. I'm glad stabilizers are thing in Medibang.
The gradient looks good in the background, and I like how they turned out, but the colors aren't very weel spaced out. The head is much lighter than the back of the kakapo, and because the piece isn't symmetrical, it makes one side of the picture look heavier than the other side. In Bartel's pictures, the animals heads look like they are floating, while mine seems to have shading. This was because as I added the details to the feathers, my arm got tired, making my lines thicker and darker. While the bird looks like it's floating, the full form doesn't have the same weightless look to it.
I also think I should have edited the color palette a bit, as the colors aren't always high contrast enough, and doesn't pop as much as Bartel's does. This could be because I stared at it for so long while making it, but the colors don't seem quite as bright. I also notice she didn't use any dark colors, even for the line art, which is actually a gradient. Using an altered color palette, and more gradients would really improve the piece.
Other than just the animal, Bartel also added to the image by contrasting it with beautiful colors. This not only keeps the image interesting, but keeps it from blending into one blur of bright color.
If given more time, I would also like to continue the series, adding more 20 by 20 cm panels, using different animals as inspirations. I may continue this over summer vacation. I usually get bored, and this was actually a lot of fun. Now that I know how to use it easier, I think I'll do more digital art in the future.
